I’ve always considered myself reasonably privacy-conscious. I use a password manager, I’ve got two-factor authentication set up on everything that matters, and I gave up on using my ISP’s default DNS servers years ago. But it wasn’t until a few months ago, while digging around in Windows 11’s network settings for an entirely different reason, that I stumbled onto something that made me feel like I’d been leaving a window cracked open the entire time.
There’s a native encryption setting buried in Windows 11 that seals one of the most overlooked privacy gaps on any internet-connected PC, called DNS over HTTPS. It takes a few minutes to turn on, it’s completely free, and, given how rarely anyone talks about it, most people have no idea it exists.
Your router has been narrating your browsing habits this whole time
Consider it your ISP’s favorite reading material

Before getting into the fix, it helps that you understand what’s actually happening every time you visit a website. You type in an address, and before your browser even loads anything, your computer has to ask a Domain Name System (DNS) server to look up the corresponding IP address for that domain. Think of it like asking directory assistance for a phone number before you can make a call.
The uncomfortable part is that this lookup has historically happened in plain text, completely unencrypted, over your network. That means your internet service provider can see every domain name your machine requests. So can anyone else on the same network, which becomes a real concern on public Wi-Fi at a coffee shop, airport, or hotel — even if public Wi-Fi isn’t the danger VPN companies want you to think it is by default. Even if every website you visit uses HTTPS (that little padlock in your browser), the DNS request that precedes the connection is still exposed. While HTTPS encrypts the specific path and content of your visit — like the article you are reading — the initial DNS query still clearly broadcasts the destination host. Someone watching your traffic wouldn’t see your specific interactions, but they’d see your destinations quite clearly.
This is not a paranoid edge case. In the United States, after Congress and the president repealed the FCC’s broadband privacy rules in 2017, ISPs gained more latitude to collect and use customer browsing data under a less restrictive framework. Furthermore, even if you trust your ISP, plaintext DNS is vulnerable to “spoofing” or “hijacking,” in which attackers redirect you to malicious sites by intercepting your DNS requests. This exposure is routine and largely invisible, which is exactly what makes it easy to ignore.
This is how to enable DNS over HTTPS (DoH)
No command line required, thankfully
DNS over HTTPS (DoH) is the solution, and Windows 11 bakes support for it directly into the operating system. The feature encrypts your DNS queries within standard HTTPS traffic over port 443, making them indistinguishable from any other secure web request. Nobody snooping on your connection can see what you’re resolving.
While there are different ways to change DNS server settings on Windows 11, the easiest is through the GUI. Open Settings, then head to Network & Internet. Click on either Wi-Fi or Ethernet, depending on how your machine connects to the internet. On the next screen, select Hardware Properties. Scroll down until you see DNS Server Assignment, then click Edit next to it.
In the dialog that appears, switch the dropdown from Automatic (DHCP) to Manual, and toggle on the IPv4 switch. Now you’ll need to enter a pair of DNS server addresses that support DoH. There are three solid free options worth knowing:
Cloudflare: Preferred DNS 1.1.1.1, Alternate DNS 1.0.0.1Google: Preferred DNS 8.8.8.8, Alternate DNS 8.8.4.4Quad9: Preferred DNS 9.9.9.9, Alternate DNS 149.112.112.112
The 6 Best DNS Servers for Improved Online Safety
Changing your DNS provider? These are the six best DNS providers that’ll protect your security and privacy.
Cloudflare tends to be the fastest globally and has a strong privacy policy. Quad9, based in Switzerland, adds an extra layer by blocking connections to known malicious domains. Google’s servers are extremely reliable and have high uptime, though it retains some query data for 24 to 48 hours for diagnostic purposes. Pick whichever aligns best with your priorities.
Once you’ve entered the addresses, look for the DNS over HTTPS dropdown under each server field and set it to On (Automatic Template). This tells Windows to handle the encryption automatically without requiring any manual configuration. Then locate the Fallback to plaintext toggle and turn it off. This step is easy to miss, but it matters: leaving Fallback enabled could cause your system to silently revert to unencrypted DNS queries if the encrypted connection stumbles, which defeats the entire purpose of this setup.
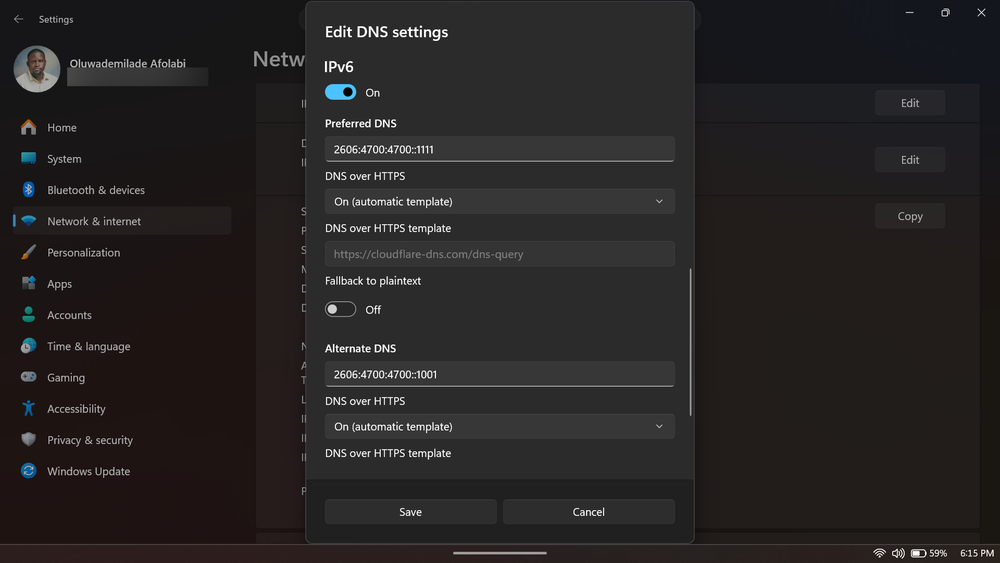
If you’re using IPv6, which many modern ISPs do by default, it is vital to scroll down, enable that toggle as well, and enter the matching IPv6 addresses for whichever provider you chose. Skipping this can result in vulnerabilities similar to those caused by DNS leaks, which can destroy anonymity when using a VPN, where your computer sends unencrypted queries over IPv6 even while IPv4 is secured. Cloudflare’s are 2606:4700:4700::1111 and 2606:4700:4700::1001 and Quad9’s are 2620:fe::fe and 2620:fe::9. Hit Save, and you’re done.
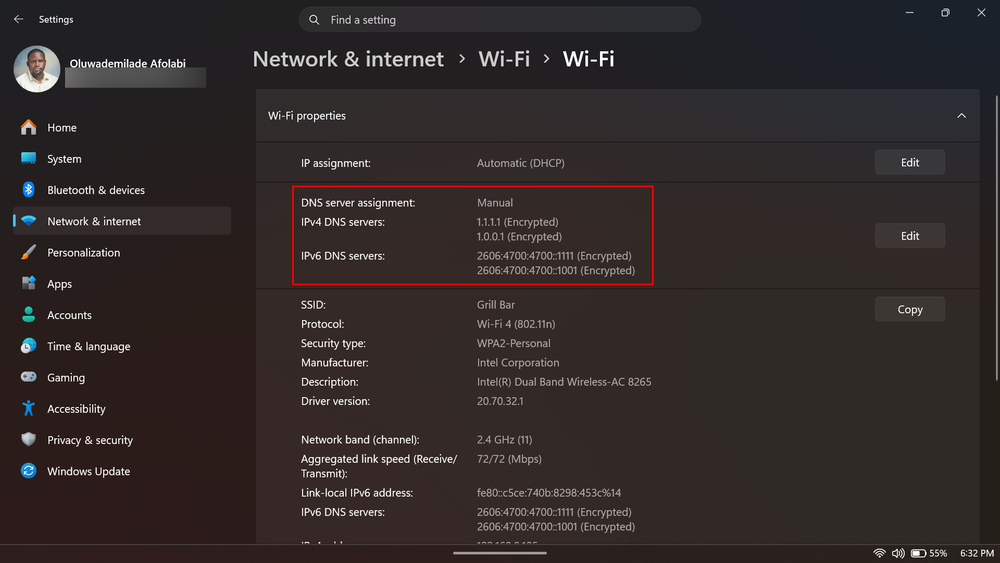
To confirm it worked, return to the Hardware Properties screen. Besides your DNS addresses, you should now see a label labeled Encrypted. That label is the whole point, confirming that your domain requests are now hidden from prying eyes.
Every app on your PC benefits from this one change
While it is true that changing your browser’s DNS settings is an important privacy step — and Chrome, Firefox, and Edge all offer their own DoH settings that are worth enabling — browser-level DoH encrypts only the DNS queries generated by those specific browsers.
Windows 11’s system-level DoH encrypts every DNS request that leaves your machine, regardless of which application triggers it. That includes your email client, your game launcher, Spotify checking for updates in the background, Windows Update itself, and every other piece of software making network requests you’re not actively watching. A browser setting covers none of that.
It also means you only have to configure this once. There’s no application-by-application tweaking of settings, no extensions to install, and no third-party software to maintain. The operating system handles it at the foundation, which is exactly the right place for something this fundamental to sit.